Showing posts with label Special Occasions. Show all posts

Christmas Gift Guide Volume Two : Make it Yourself

I am definitely guilty of planning to make too many Christmas presents then ending up in an absolute flap three days before because I haven't finished them. This year's plan is to get everything bought by December the 1st, then everything made in the first two weeks of December so when we get the tree up and start decorating the house everything is done! 

On that note, today I'm sharing some ideas for gifts you can make yourself. Some are super simple and others are a little more time consuming, but hopefully it's early enough and if you do want to make some presents this year you'll have plenty of time to get everything finished! 

I'll be adding more ideas to all the gift guides throughout November and December so keep checking back if you're enjoying them. I've added a tab to the menu bar above where you'll be able to find them all! 


My parents seem to get given two or three plants for Christmas every year, poinsettias or hyacinths that are picked up in the supermarket, last five minutes, and (in the case of hyacinths) smell bloomin' awful!

You can buy much more stylish (and longer lasting) cacti and succulents for a few pounds, and repotted into a homemade planter they can become something really special. I love this woven planter tutorial from Teri at The Lovely Drawer, and she has several other planter tutorials on her blog too, like this hanging one, and this painted rope one.

Baked Goods in Tins

It's always lovely to get something homemade, and you cant go far wrong with a tin of homemade goodies. The set of three in the image above are from Ikea are only £6, and you can usually find similarly priced ones in supermarkets, or Tiger were pretty good for tins last year too. However if you put a little more money and thought behind it the container can also double up as an extra present.

These personalised jars are a little pricey, but I think they're beautiful. A quick search on eBay will uncover an array of vintage Quality Street tins for a bit of festive nostalgia, or this set of Orla Keily tins could prove quite good value as they can be split to give as several gifts.


If you have children to buy for but like to steer clear of things that will become additions to the plastic mountain, making a gift is perfect. There's nothing better than seeing someone really loving and using something you've made for them and handmade things are sure to become firm favourites. I made a farmyard version of this little backpack last year and was SO pleased to see it still being used at a recent family gathering. If you can sew straight lines, you can definitely make this and I've split the tutorial into three with really clear visual instructions - I'd love to see what you come up with if you decide to make one yourself.  


This recipe is a bit of a Christmas tradition in our house. We've been making it since we were at uni and it never fails to go down well, it's not too spicy, but not sickeningly sweet like some chilli sauces and you can vary the heat too depending on how hot your chillies are. It's really really simple to make and looks really festive tied up with twine and a pretty tag. Package it up with some nice crackers and strong pecorino for extra brownie points!  


It's all too easy to fall back on bath and body gift sets at Christmas, and while it's always nice to get some nice bits you wouldn't necessarily buy for yourself, you can quickly end up inundated with too many body lotions. This lavender sugar scrub is a bit different, really easy to make and feels luxurious, especially when it's used as part of a foot soak ritual. If you click through to the recipe I've also added a downloadable gift tag with instructions for the ultimate at home pedicure that you can add to the jar. You could make it really special by adding some nice socks and perhaps some lavender tea or chocolate treats for the recipient to enjoy while they're treating themselves to a post-Christmas-pedicure.  
SaveSave

Christmas Gift Guide Volume One : For The Food Lover

Now, I'm very aware that some of you may be thinking that it's far too early to be considering Christmas given that there's still 54 days to go until the big day. However, I for one am very prone to ending up feeling stressed and flappy in December about how much I've got left to do, not really enjoying the build up at all and then ending up absolutely exhausted on Christmas day itself.

It's daft really isn't it; buying presents is the best fun, we all love making our houses look extra sparkly and Christmas dinner is really just a roast with extra vegetables - yet somehow we seem to get ourselves in an absolute tizz about the whole thing which is often over quicker than blinking.

With that in mind, for the last couple of years we've tried to get all our Christmas shopping done before the first of December so we can then enjoy decorating the house, planning all the food and watching Elf and The Holiday multiple times with one less thing to think about.

To hopefully make that process a little easier for everyone, I've put together a series of Christmas Gift Guides which will be posted throughout November. I've tried to steer away from aiming them at Mums or Grandads or Brothers or whoever and instead focussed on the interests of the people in our lives we need to buy gifts for. Hopefully there's something for everyone, and for a range of budgets too.

So first up, we have a roundup of gift ideas for food lovers...


This is something we came across on our recent trip to Stockholm, and I think it's the epitome of beautiful and useful combined. There is a small version for grating at the table, and a larger kitchen version for grating into dishes. I love how simple the design is and how it brings a real sense of occasion to seasoning your food. I think it would be perfect for someone who takes pride in the way their kitchen looks or loves setting a table to entertain. There's also a raw liquorice version if the recipient is that way inclined - which I am...liquorice hot chocolate anyone? 


D bought me a Cocoa Runners subscription for my birthday back in September and I can't tell you how exciting it is to have a box of the worlds best chocolate drop through your letterbox. These are not your average bars of corner shop crap, but the most exquisitely flavoured (and packaged) bars of really complex and distinctive chocolate. If you know someone who is into wine or coffee tasting, this would be an excellent choice. 


Every foodie loves a cheese board right? With this kit they'll be able to make 10 different varieties of cheese at home. I love that this gives total control over what type of milk is used and exactly how each one tastes. The kit comes with everything you need (except milk of course!) plus a recipe book, and enough ingredients for 40 batches of deliciousness!  


I have a LOT of recipe books. Like, 300 a lot. However, I don't always cook from them, and more often than not we just make things up as we go along, or base a meal on a recipe but change it around according to what we have in the fridge.  The Flavour Thesaurus looks like it would be so useful on those days when you can't decide what to eat, or when you know you fancy something cheesy but can't quite work out what else you want and you're not a student anymore so eating a single foodstuff and calling it a meal isn't ok. It's divided up into chapters based on the type of flavour, and has 99 foods listed along with pairings for each and over 200 recipe suggestions. Plus, who doesn't love a good book for Christmas.


The Raw Chocolate Pie Company are based in Cornwall and are a longstanding favourite of mine. Their Cacao Nib grinder is used all the time in our house, and is perfect for adding a really intense chocolate flavour to sweet dishes, some of our favourites being crumble topping, porridge and ice cream sundaes, but also for adding a really interesting depth to chillies and stews. I think it would make the perfect interesting stocking-filler-chocolate-alternative for a food lover. 

***

That brings us to the end of volume one. I hope it's got you thinking about your gift lists and maybe started to spark some ideas. Say tuned throughout November for more gift giving ideas, including guides for new parents, coffee lover, bearded ones and those annoying people who seem to have everything! 

DIY Tutorial: Bunting Cake Topper


It's been approximately a millions years since I've written a tutorial post, and the reason for this is that its been approximately a million years since I've actually made anything. 

This is a super easy one but I think it will also be really useful as it can be really easily adapted for any occasion, plus a nice topper can make a simple cake feel much more celebratory! 

I actually made this for my friend Grace and her daughter Evelyn who's first birthday isn't until the weekend. I therefore don't have any photos of it in situ atop a cake, but hopefully you'll get the idea. Also (apparently I'm trying to squeeze in as many apologies as I can in the first few paragraphs of the post) the light while I was taking these photos kept changing, and then my camera battery ran out so just pretend the photos are amazing okay? 


So, you will need:

- Paper to use as a template
- A plain coloured paper (I used the pearlised pink)
- Patterned paper 
- Twine
- Straws to tie your finished bunting to
- Scissors, a ruler, glue and a pencil! 
- Letter stickers. Of course you could cut out letters from paper and stick them on, but the stickers are really easy and I love the Meri-Meri All Wrapped Up glitter stickers. I bought about 5 packets in TKMaxx a while back and I use them a lot, so much so that if I ever see them I'll buy another packet because I'm a bit scared of running out! 

First things first, you'll need to make yourself a template in the shape shown. Mine was 4.5cm wide by 14cm long, and I just eyeballed it based on the size of the stickers. Cut out the required number of flags from your patterned paper, or whichever paper you're going to have as the base of your flag. I did three! 

Once you've done that, cut about 4-5mm off your template all the way around to make a template for the smaller part of each flag. You can use a ruler and measure it, or just guess with the scissors.

(See what I mean about the light changing? Nightmare.) 


I feel like the rest of this is very self explanatory! Glue the layers together, then fold each flag in half. You might beed to have a little trim up if the front and back don't quite match up.  

Pop your letter stickers on to each flag. I chose to put a sticker on the back of each flag too so that the topper works from either side. If you want to do the backs too, make sure you get them the right way round so your chosen word doesn't end up backwards!    


Stick each flag onto a length of twine, and you're done! 

When it comes to popping it onto your cake, tie each end of the twine onto the top of each straw. If your cake is really soft you can probably just push the straws into the cake, but it may be easier to cut some barbecue skewers down to just shorter than the length of the straws, then pop those into the cake at an angle and slide the straws over the top.   


Pumpkin DIYs: Spiced Candles, Chocolate Cookies and Vanilla Cacao Pumpkin Seeds

Pumpkins and squash on the hearth

Earlier this week, my sister and I walked the mile or so to the farm shop down the road from us to pick some fruit and choose some pumpkins! We had a lovely hour or so there, taking photos and marvelling at the completely natural looking, almost neon coloured berries and leaves. 

We found it really difficult to choose, so ended up with armfuls! After picking a bag of apples and pears each, plus a jar of honey (can't get more local than a mile away!) we laughed on the way home about how we'd end up looking like Mr Tickle after carrying so much weight! 


I really wanted to make the most of all this wonderful produce, and of course they will be making their way into the usual soups and curries, but I had a few other things in mind too...


Pumpkin Spice Candles

Every year I'm fascinated by these mini gourds, and I picked out a couple to have a play with (and ticked an item off my Autumn Bucket List while I was at it too!)

mini pumpkins

small green pumpkin

miniature pumpkin

mini pumpkins

mini pumpkins on grey

Turning these little guys into candles was really easy! The night before you want to make them, warm around half a cup of rapeseed (or other unscented oil) in a pan, and add your favourite autumn spices. I chose cinnamon, nutmeg and a little allspice - approximately three teaspoons all together. I also added a little vanilla, and the zest of a whole orange. Once warm, leave the oil in a container overnight to infuse. I used half a cup for three small candles, so up the amount depending on the size and number of candles you're making! 

how to make pumpkin candles with infused oil

Next, hollow out your mini pumpkins! I decided to use the orange ones and save the green one to cook later (I'm sure these have real names - but for now we'll go with orange and green!) 

I sliced the whole top off the first one, and for the second I used a cookie cutter to punch a hole in the top and a teaspoon to remove the seeds and flesh. 

how to make pumpkin candles

Next melt your wax! As I was only making three candles, rather than buying a large quantity of wax I melted some good quality soy candles - four dinner candles was almost exactly the right amount for my three candles. Place the wax into a glass or metal just or bowl, then place this over a pan of boiling water and keep a close eye on it while it melts. Whatever you do don't try and melt your wax directly on the heat - use a double boiler to keep things safe! 


wax melting in double boiler

While your wax melts you can get your wicks ready! My candle wicks were very kindly given to me by Rachel of Graceful Wildling who read my post about wanting to make candles and donated some of her unwanted supplies to me! I'm really very grateful, and I'm loving the real life connections the often lonely world of the internet helps us to make (look out for a little thank you in the post soon Rachel!) 

You would usually stick the metal base to the bottom of your candle container, but as it wouldn't stick to the slightly damp pumpkin interior I simply pushed one edge of the metal into the pumpkin to hold it in place. To stop the wicks falling over and ending up off centre, prop them up with some skewers or similar.  


how to make pumpkin spice latte candles

Once youw wax it melted, pour in your infused oil and give it a good stir. Working quite quickly as the oil will have brought the temperature of the wax down, fill each of your pumpkins with wax. 

how to make pumpkin spice candles

When the wax is very nearly set, you can sprinkle the top with some extra spices. I also added a few coffee beans as a nod to the pumpkin spice latte grand (which I still can't stand I'm afraid!)

pumpkin spice latte candle

how to make pumpkin spice latte candles

how to make pumpkin spice latte candles

Trim your wick, leave to set completely, then light and enjoy! I also made one in a tiny glass jar and added some of the orange zest from the infused oil. 

pumpkin spice candles tutorial

Geometric Patterned Lantern

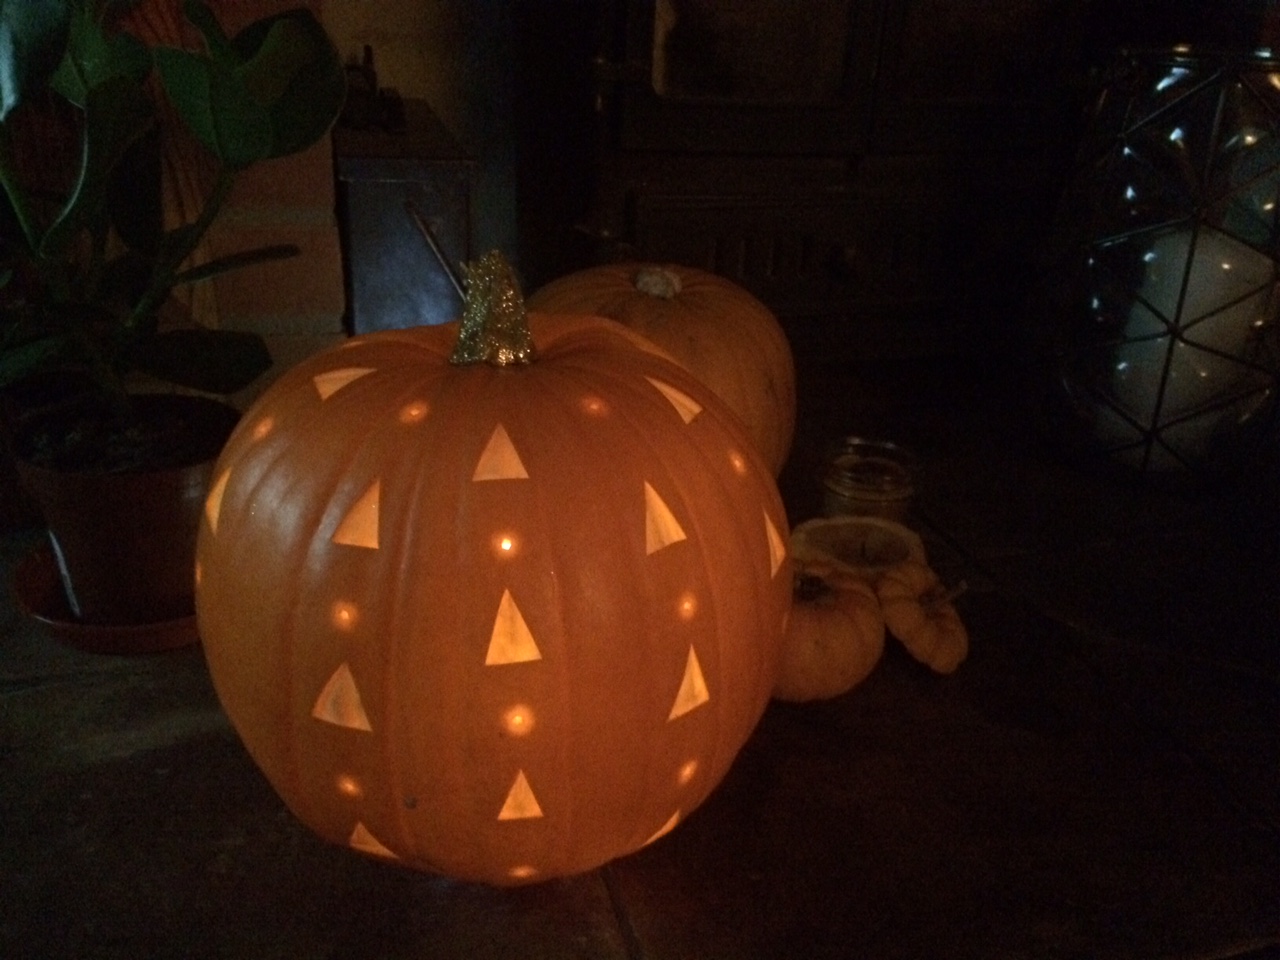
Of course, one of the pumpkins was destined for carving, but I didn't fancy carving the usual scary face! I used a craft knife to gently score each triangle into the surface of the pumpkin, then removed only the top layer of skin, exposing the flesh underneath. To allow a little more light out I used a small drill bit to puncture holes between the triangles. A little PVA glue and glitter on the the stem, and my pumpkin is complete!  


pumpkin with glitter stem and pumpkin spice latte candles

glitter stem pumpkin

glitter geometric carved pumpkin

I'm so pleased with it! The opposite of scary and much more about celebrating the beauty of the season which is what our halloween is all about (I wrote more about this last year

Chocolate Squash Cookies

Now, I'm really not a fan of pumpkin spice lattes - I just don't think a vegetable belongs in a coffee! However, I am a fan of vegetables in cakes and decided to have a go at some butternut squash cookies!

I'm quite pleased with them - the texture is somewhere between cookie and brownie, and I think with a few more oats they could be pleasingly flapjack-y!

You will need:

400g peeled and diced squash or pumpkin
1/2 cup of plain flour (I used wholemeal spelt)
1/2 cup of oats 
1/2 teaspoon baking powder
1/2 cup of peanut butter (I used crunchy!)
1/2 - 3/4 cup of sugar or sweetener of choice (I used coconut sugar, and kept it to 1/2 a cup - the squash gives quite a lot of sweetness)
2 tablespoons coconut oil
100g really dark chocolate 
A pinch of sea salt


cubed butternut squash for pumpkin cookies

Method:

1. Boil or steam your squash until cooked through, then drain and leave to cool slightly

2. While your squash is cooking, mix the flour, oats, and baking powder in a large bowl

3. Place the cooled but still warm squash into a food processor (if you don't have one I imagine this would work fine with a bowl and a potato masher!) and whizz until smooth

4. To the pureed squash, add the peanut butter, sugar and coconut oil. Whizz up again. The warmth from the squash should be enough to liquify the coconut oil and soften the peanut butter. 

5. Pour the butternut mixture into the flour and oats, and mix well. Depending on the type pf flour you used, and how much water your squash absorbed you may need to add some extra flour. It should be slightly looser than a dough, but not so loose that it won't hold its shape. At this point add the chopped chocolate and mix well. The slight warmth should just melt the chocolate so it ripples through the mixture. 

6. You can either bake these now, or freeze to make later. To bake straight away, line a tray and dollop tablespoonfuls (I love that word!) of mixture onto the tray, flattening each out slightly into a rough cookie shape. Top each with a few extra oats, as sprinkle of sugar and a few flakes of sea salt. Bake for 12-15 minutes at 180 degrees - they will be a little soft when you first pull them out of the oven, but will firm up slightly when cooled (although they should still be soft and brownie like!)

7. Alternatively, place the mixture onto some greaseproof paper, roll into a sausage and freeze. When you want to bake you can slice off as many pieces as you need, then bake for approximately 18 minutes, pulling them out after 3-4 to add the extra toppings! 

pumpkin cookies

how to make pumpkin chocolate chip cookies

recipe for pumpkin cookies

These didn't last long at all! Thankfully I still have half the mixture in the freezer for later! 

Vanilla Cacao Pumpkin Seeds

I didn't want all those pumpkin seeds to go to waste, so I threw together this little concoction and it was AMAZING! It's so simple its not even a recipe, and I can't be specific with measurements, so just experiment with what you fancy! 

Wash and dry the seeds, put them in a bowl with a drizzle of rapeseed oil, a sprinkle of coconut sugar, a teaspoon or so of cacao  (or cocoa) powder and a generous pinch of salt. Roast in a hot oven until they're crispy and beginning to pop! The coconut sugar will caramelise and the sweet and salty combination is the best! 

I ate an entire pumpkins worth of seeds in about five minutes! 


recipe for vanilla cacao pumpkin seeds

There we have it! A plethora of ideas for using those pumpkins you just cant resist buying! I think I've caught the candle making bug and definitely want to try some with essential oils, and I'm dying to experiment with infusing the oil with herbal tea...watch this space! 

Happy Halloween!! 

Twenty Eight Trips Around the Sun


This is a photo of me aged five, finally being allowed to lick the spatula after making a Victoria Sponge! You know what the most remarkable things about this image is, aside from my decidedly sinister face-pulling? It was taken 23 years ago, and that red plastic sieve is still is in regular use at my parents house! 

Anyway, Saturday before last I celebrated my 28th birthday! Yep, 28 times round the sun. This time last year, I wrote about my 27th birthday, and when I read that post back, I realised how many of the things I was hoping for I've managed to achieve this year. I wrote about how I was ready to stop wasting time, and get off my bum and do things, I had just begun to realise that our little cottage was far too small and maybe it might be time for a change, and I also wanted to learn about house plants!

Last Minute Valentines Day Garland


This year is our thirteenth Valentines day together! Over the years, we've sort of got out of the habit of celebrating it (in fact the only time I've ever received a valentines card was when I was about 15, and D's Mum bought him one to give to me, horrified that he wasn't going to get me one!) Since then, we haven't bought each other cards for any occasion, but we have some times bought each other little valentines presents, or gone out for a meal together.

This year though, on our first Valentines day as Husband and Wife, D has gone to work at a recording studio (though I suspect he is really just drinking snazzy coffee...the studio owner also runs a coffee shop next door, with the most amazing in house roasted coffee and cold brew!) and I have been food shopping, cleaning, and chasing after the cat who had an unfortunate litter box/part digested thread/poo disaster which meant I have bleached the kitchen floor and thrown away the door mat.

So, to make myself feel just a little more festive, I bought myself a bunch of tulips, and spent a couple of hours making something to make the house feel a bit more festive. I got the idea from Molly at Almost Makes Perfect. Her lovely garland was made from bare wood hearts, but I fancied something with a little more colour...and glitter (we had loads of gold glitter left over from the wedding)

I used masking tape cut into different widths to mask off the lines, and painted the gaps with pink acrylic paint, or pva, then sprinkled the gluey areas with glitter. I also painted the edges of some of the hearts with glue, and sprinkled glitter on them too. Then I taped them all to a length of pink twine, and strung the garland up above our rather unorganised mantlepiece. I'm quite pleased with it!


Happy Valentines Day! 

Thoughts on Another New Year


It's that time of year again where time and space go all wobbly. Christmas has been and gone, but there's still a sort of festive haze hanging over everything, there may or may not still be presents strewn around that are yet to find homes, it's deemed perfectly ok to eat dessert-foods for breakfast, nobody really knows what day it is and you turn up at the supermarket for an emergency purchase and then remember it's a bank holiday and they closed three hours ago!

I really like these few days. A chance to have some space to relax and muse over the events of the past year, and ponder the coming one. We usually like to take down the decorations soon after boxing day, give the house a bit of a clean and prepare to start a fresh new year without any Christmas paraphernalia hanging around.

D is back at work already, so I'm spending the day time part of this New Years Eve alone (we'll be going to his parents house later on this evening) but I'm quite looking forward to it. I'm currently wearing a face mask and eating porridge (as one does) but I'm planning to head into the city, treat myself to some new stationary (because I didn't get quite enough new notebooks for Christmas) get my nails done, and make myself a plan for 2016.

I don't really do resolutions as such, there's never really been anything huge that I want to give up or change. I've already made a start on a list of things I want to do or achieve before I'm 30, so I'll carry on working through those (and will probably share a few as a go too) but I do want to share something I've been doing for the last few years, but which feels really poignant this year.

I've followed Susannah Conway's creativity and mindfulness blog for a long while now, and each year I look forward to her 'Unravelling the Year Ahead' workbook. This workbook (which you can download for free here) prompts you to think about the year that has gone, what you have learned from it, the gifts it has given you and the things that have changed in the last 365 days. Then it goes on to help you look to the coming year, to set out your intentions, hopes, dreams and plans.


One of my favourite parts of the workbook is choosing a word for the year (Susannah also runs a five day 'course' via email if you need extra prompting to figure out what your word might be) This is a word that acts as a mantra, guide, or reminder for the year - a word that you can refer yourself back to during the year to remind yourself of where you're headed. As Susannah says, you can't break a word, so this is a way of setting out your intentions without the pressure of a resolution.

The word I chose last year was 'clarity', the year before that it was 'brave'. This years word came to me really easily, and it already feels like one that I will hold onto more tightly than previous years. I briefly toyed with the word 'tend', and even more briefly with the word 'whole', but settled on 'become'.

There are lots of things I want to become this year, so in simple terms it's a selfish word, about giving myself the space and the energy to become those things, those versions of myself. D has chosen a word too, I won't share it here, but it is rather pleasingly the perfect partner to mine, very different but very complimentary.

So today I'm planning to fill out the rest of the work book, and make a bit of a plan. 2016 is the first whole year we will have been at a stage in our lives that doesn't have a label or a clear end goal, we're no longer students, first time buyers, or wedding planners. Although we're in the middle of the house selling/buying process, it doesn't feel as monumental as the first time, just the next logical step. It's exciting to be heading into a new year with a little bit of uncertainty as to what happens next, but also with the prospect of feeling really settled for the first time ever and having the space in our heads to figure out what our married life holds!

I hope everyone has a wonderful evening celebrating the passing of 2015, and I'll see you in the New Year!