Showing posts with label For The Home. Show all posts

DIY Tutorial: Faux Fabric Cable Light Fitting


I have something of a thing about light fittings. I feel like they're a really important feature in a room, and in most of the rooms in our house we've completely changed them for something that's a focal point. However, striking light fittings aren't cheap, and if they are then they're almost always striking for the wrong reason, so in our two spare bedrooms we've left the plain white fittings up, and with a little help from some cotton yarn given them the look of fabric cable without re-wiring anything! 


As you can see, it wasn't the most attractive thing, but wrapping the cable is quick, relatively easy and after changing the discoloured part of the lamp holder for a new white one, and hanging a new shade, it look significantly less...blah. 


First, unscrew the ceiling rose, and thread the end of the yarn up through the hole. Tie it to the top of the cable, then screw the rose back up.


Then just get wrapping! Keep the loops as tight close together as possible, sliding them up the cable to close up any gaps.

Your arms will definitely ache, but it's much easier to wrap the cable with it still attached to the ceiling - in our other spare room I took the fitting down to wrap it and everything kept getting tangled up.  If you need a rest, stick the yarn to the cable with a piece of masking tape and let the ball trail to the floor (watching out for any cats who may have come along to "help")


Keep wrapping until you reach the bottom, then tie the yarn off with a knot. 


Cut off the excess, add your shade (ours is from Next) and you're done!


Much better I think you'll agree.

I'll be sharing a full reveal of this room soon. One day it will be our first child's room, and it feels like a really positive thing to be getting a room ready for whenever and however they arrive. If you'd like to read our IVF journey so far you can find it here.


Ikea Hack: Copper Pipe Towel Rail Shelf


When we bought our first house, we spent an entire year renovating and decorating before we moved in. It definitely needed it, but doing the entire house at the same time was pretty overwhelming and we made so many decisions all at once that we realised once we started living there that some of them might not have been the best. So, when we moved into our current house in May last year we decided to live here a while and decorate much more slowly! 

The first room we've finished (aside from the spare room that we quickly spruced up for my sister when she moved in) was the downstairs toilet - glamorous right?! It's a tiny little space, so much so that there wasn't enough room on the sink to keep the hand soap! We also needed a rail for a hand towel and nothing I could find fit the bill, everything was too big, too chrome plated or too expensive to justify given it's just the downstairs toilet! 


So, I refashioned the classic bekvam spice rack from Ikea and hung it upside down so the bottom became a little shelf for the hand soap and a few bits and bobs, and the rail made to hold the spices became a rail for a hand towel. I'm really pleased with how it turned out. It's just the right size for the space and the copper pipe ties it in to the rest of the room perfectly! The spice rack itself was £3, and I bought a 50cm length of copper pipe on eBay for about £6 so it's super cheap too! 
If you'd like to make one too you'll need:

Bekvam Spice Rack
22mm diameter copper pipe
Piper cutter
Paintbrush
Paint/varnish or wood stain (I did one coat of a pale grey acrylic paint but wasn't happy with the colour so I lightly sanded it off and used this darker grey interior wood varnish. We used it in our old house on the bannisters and I still had a little left so it was basically free!)


First you need to cut the copper pipe to the same length as the rail of the spice rack. I didn't measure it, just lined it up and marked the point I needed to cut. Remember not to include the two tabs at the end as these will be pushed into the side panels of the spice rack, the pipe only needs to be the same length as the wider, visible part of the rail.


Use a pipe cutter to cut the pipe to length. Make sure the blade of the cutter is lined up to the mark and tighten it up. Twist the cutter around the pipe a few times until you can't feel any more resistance, then tighten it a little more, and twist again. Keep doing this until you've cut all the way through, and make sure not to tighten it too quickly or you'll squash your pipe! 


If there are any bar codes or letters printed on the pipe you can polish them off with a little bit of abrasive cleaner (or I've heard nail varnish remover and ketchup will also work!) and remove the pen mark you made too. 

Slide the pipe onto the wooden rail, it will be quite a tight fit and mine would only go on one way. You may need to sand the rail slightly but a tight fit is good as it won't slide around and cause your towel to fall off! 


Next paint or stain all the other wooden parts, but don't paint the edge with the metal fixings as you'll need to remove them later, plus that edge will be against the wall! 


Give the whole thing two or three coats depending on the paint you're using. The edges may need a light sand in between coats to avoid getting a build up of paint.

When it's dry, assemble the spice rack as per Ikea's ever helpful instructions and admire your handiwork! 

The spice rack hangs on the wall from two screws, and as it will be mounted to the wall upside down the last thing to do before hanging it is to remove the metal fixings on the back and re-attach them upside down too! 

Hang on the wall, add your hand soap, a hand towel and a succulent in a 60's egg cup (non-optional) and you're done!


Tutorial: Easy Leather and Copper Hanging Planter Update


Like most of us plant lovers, I've got quite the collection! Mostly they adorn windowsills and side tables, but as we're decorating at the moment I've been planning to spread them around the house a little more and give them proper homes! 

I like the idea of hanging planters, and there are some really affordable ones around - but, they're often let down by cheap looking hangers. I bought this small one in Tiger, and the shape is fun but I wasn't really a fan of the cord hanger. My sister bought me the larger one for Christmas, and while I love the dipped copper effect, the rope hanger was far too bulky and didn't feel like it would support much weight.


So, I untied the old hangers and using some leather cord and copper wire, made some hangers that are a lot simpler and much more in-keeping with the general feel our finished rooms will have. 


For the larger one which has three hanging points, I cut three lengths of leather, and threaded one (from the inside) through each hole, then secured it in place by wrapping it tightly with a length of copper wire.


If you have a go at this yourself, make sure to wrap the wire really tightly, and pull each piece of leather firmly to make sure it will be able to take the weight of a plant. If you were doing this with a much larger and heavier pot you could glue the leather in place first then cover the glue with the wrapped copper. 


Once you've done all three, gather up the ends and make sure they're still roughly equal. 

Next, I decided to add a wooden ring (an old curtain ring) to add a little interest and also so the hanger can be suspended from one piece of leather rather than trying to attach all three together, thus creating the same bulk I was trying to avoid! 


Next, I removed the hook from the ring and replaced it with another length of leather. I made a second loop at the top for hanging, and wrapped a small section of the ring with some more wire. 


For the small planter, I simply replaced the single length of black cord that was knotted at each end with a length of leather secured with wrapped wire! 


They're still awaiting their plants, I haven't quite decided yet which ones are going where, but I much prefer their new look! 


SaveSave

Pumpkin DIYs: Spiced Candles, Chocolate Cookies and Vanilla Cacao Pumpkin Seeds

Pumpkins and squash on the hearth

Earlier this week, my sister and I walked the mile or so to the farm shop down the road from us to pick some fruit and choose some pumpkins! We had a lovely hour or so there, taking photos and marvelling at the completely natural looking, almost neon coloured berries and leaves. 

We found it really difficult to choose, so ended up with armfuls! After picking a bag of apples and pears each, plus a jar of honey (can't get more local than a mile away!) we laughed on the way home about how we'd end up looking like Mr Tickle after carrying so much weight! 


I really wanted to make the most of all this wonderful produce, and of course they will be making their way into the usual soups and curries, but I had a few other things in mind too...


Pumpkin Spice Candles

Every year I'm fascinated by these mini gourds, and I picked out a couple to have a play with (and ticked an item off my Autumn Bucket List while I was at it too!)

mini pumpkins

small green pumpkin

miniature pumpkin

mini pumpkins

mini pumpkins on grey

Turning these little guys into candles was really easy! The night before you want to make them, warm around half a cup of rapeseed (or other unscented oil) in a pan, and add your favourite autumn spices. I chose cinnamon, nutmeg and a little allspice - approximately three teaspoons all together. I also added a little vanilla, and the zest of a whole orange. Once warm, leave the oil in a container overnight to infuse. I used half a cup for three small candles, so up the amount depending on the size and number of candles you're making! 

how to make pumpkin candles with infused oil

Next, hollow out your mini pumpkins! I decided to use the orange ones and save the green one to cook later (I'm sure these have real names - but for now we'll go with orange and green!) 

I sliced the whole top off the first one, and for the second I used a cookie cutter to punch a hole in the top and a teaspoon to remove the seeds and flesh. 

how to make pumpkin candles

Next melt your wax! As I was only making three candles, rather than buying a large quantity of wax I melted some good quality soy candles - four dinner candles was almost exactly the right amount for my three candles. Place the wax into a glass or metal just or bowl, then place this over a pan of boiling water and keep a close eye on it while it melts. Whatever you do don't try and melt your wax directly on the heat - use a double boiler to keep things safe! 


wax melting in double boiler

While your wax melts you can get your wicks ready! My candle wicks were very kindly given to me by Rachel of Graceful Wildling who read my post about wanting to make candles and donated some of her unwanted supplies to me! I'm really very grateful, and I'm loving the real life connections the often lonely world of the internet helps us to make (look out for a little thank you in the post soon Rachel!) 

You would usually stick the metal base to the bottom of your candle container, but as it wouldn't stick to the slightly damp pumpkin interior I simply pushed one edge of the metal into the pumpkin to hold it in place. To stop the wicks falling over and ending up off centre, prop them up with some skewers or similar.  


how to make pumpkin spice latte candles

Once youw wax it melted, pour in your infused oil and give it a good stir. Working quite quickly as the oil will have brought the temperature of the wax down, fill each of your pumpkins with wax. 

how to make pumpkin spice candles

When the wax is very nearly set, you can sprinkle the top with some extra spices. I also added a few coffee beans as a nod to the pumpkin spice latte grand (which I still can't stand I'm afraid!)

pumpkin spice latte candle

how to make pumpkin spice latte candles

how to make pumpkin spice latte candles

Trim your wick, leave to set completely, then light and enjoy! I also made one in a tiny glass jar and added some of the orange zest from the infused oil. 

pumpkin spice candles tutorial

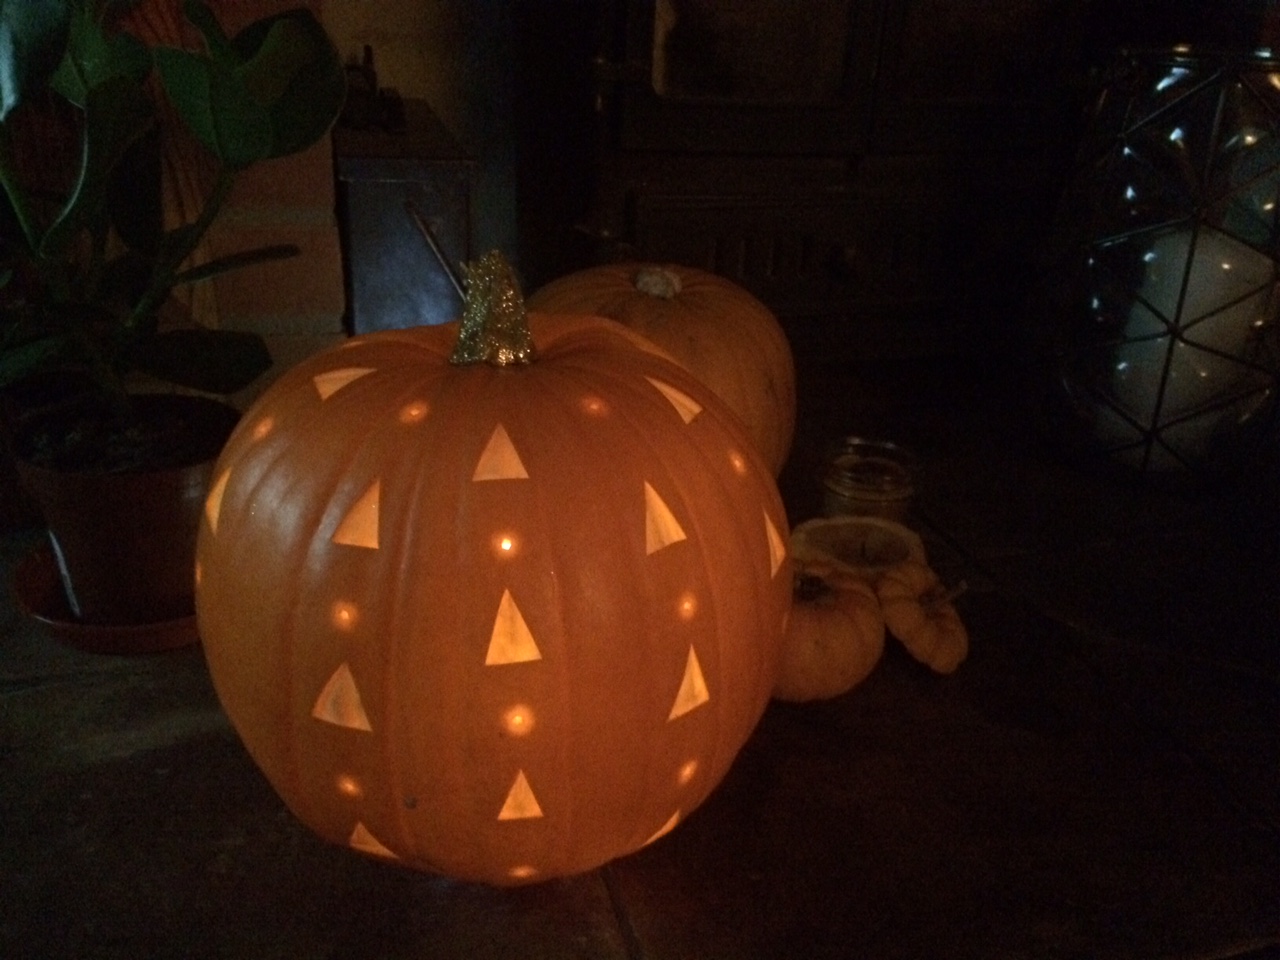
Geometric Patterned Lantern

Of course, one of the pumpkins was destined for carving, but I didn't fancy carving the usual scary face! I used a craft knife to gently score each triangle into the surface of the pumpkin, then removed only the top layer of skin, exposing the flesh underneath. To allow a little more light out I used a small drill bit to puncture holes between the triangles. A little PVA glue and glitter on the the stem, and my pumpkin is complete!  


pumpkin with glitter stem and pumpkin spice latte candles

glitter stem pumpkin

glitter geometric carved pumpkin

I'm so pleased with it! The opposite of scary and much more about celebrating the beauty of the season which is what our halloween is all about (I wrote more about this last year

Chocolate Squash Cookies

Now, I'm really not a fan of pumpkin spice lattes - I just don't think a vegetable belongs in a coffee! However, I am a fan of vegetables in cakes and decided to have a go at some butternut squash cookies!

I'm quite pleased with them - the texture is somewhere between cookie and brownie, and I think with a few more oats they could be pleasingly flapjack-y!

You will need:

400g peeled and diced squash or pumpkin
1/2 cup of plain flour (I used wholemeal spelt)
1/2 cup of oats 
1/2 teaspoon baking powder
1/2 cup of peanut butter (I used crunchy!)
1/2 - 3/4 cup of sugar or sweetener of choice (I used coconut sugar, and kept it to 1/2 a cup - the squash gives quite a lot of sweetness)
2 tablespoons coconut oil
100g really dark chocolate 
A pinch of sea salt


cubed butternut squash for pumpkin cookies

Method:

1. Boil or steam your squash until cooked through, then drain and leave to cool slightly

2. While your squash is cooking, mix the flour, oats, and baking powder in a large bowl

3. Place the cooled but still warm squash into a food processor (if you don't have one I imagine this would work fine with a bowl and a potato masher!) and whizz until smooth

4. To the pureed squash, add the peanut butter, sugar and coconut oil. Whizz up again. The warmth from the squash should be enough to liquify the coconut oil and soften the peanut butter. 

5. Pour the butternut mixture into the flour and oats, and mix well. Depending on the type pf flour you used, and how much water your squash absorbed you may need to add some extra flour. It should be slightly looser than a dough, but not so loose that it won't hold its shape. At this point add the chopped chocolate and mix well. The slight warmth should just melt the chocolate so it ripples through the mixture. 

6. You can either bake these now, or freeze to make later. To bake straight away, line a tray and dollop tablespoonfuls (I love that word!) of mixture onto the tray, flattening each out slightly into a rough cookie shape. Top each with a few extra oats, as sprinkle of sugar and a few flakes of sea salt. Bake for 12-15 minutes at 180 degrees - they will be a little soft when you first pull them out of the oven, but will firm up slightly when cooled (although they should still be soft and brownie like!)

7. Alternatively, place the mixture onto some greaseproof paper, roll into a sausage and freeze. When you want to bake you can slice off as many pieces as you need, then bake for approximately 18 minutes, pulling them out after 3-4 to add the extra toppings! 

pumpkin cookies

how to make pumpkin chocolate chip cookies

recipe for pumpkin cookies

These didn't last long at all! Thankfully I still have half the mixture in the freezer for later! 

Vanilla Cacao Pumpkin Seeds

I didn't want all those pumpkin seeds to go to waste, so I threw together this little concoction and it was AMAZING! It's so simple its not even a recipe, and I can't be specific with measurements, so just experiment with what you fancy! 

Wash and dry the seeds, put them in a bowl with a drizzle of rapeseed oil, a sprinkle of coconut sugar, a teaspoon or so of cacao  (or cocoa) powder and a generous pinch of salt. Roast in a hot oven until they're crispy and beginning to pop! The coconut sugar will caramelise and the sweet and salty combination is the best! 

I ate an entire pumpkins worth of seeds in about five minutes! 


recipe for vanilla cacao pumpkin seeds

There we have it! A plethora of ideas for using those pumpkins you just cant resist buying! I think I've caught the candle making bug and definitely want to try some with essential oils, and I'm dying to experiment with infusing the oil with herbal tea...watch this space! 

Happy Halloween!!